How to Safely Clean Your PC: The Ultimate Maintenance Guide To Stop Overheating
If your gaming rig sounds like a jet engine trying to take off every time you launch a game, it is not "high performance," it is suffocation.
I know you. You spent hours cable managing the back of your case, you synced up your RGB lighting to a vaporwave color palette, and you haven't opened that side panel in six months. Inside that tempered glass, your expensive components are slowly being smothered by a gray blanket of dust. It is gross, and more importantly, it is tanking your performance. Dust acts as an insulator. It traps heat. Heat causes thermal throttling. Throttling means your expensive GPU starts acting like a budget card to save itself from melting. I am going to walk you through how to clean this mess up without destroying your hardware.
The Arsenal You Actually Need
Before you just rip the side panel off and start blowing on your graphics card like it is an old NES cartridge, you need the right tools. There is a right way to do this, and there is a way that ends with you crying over a dead motherboard.
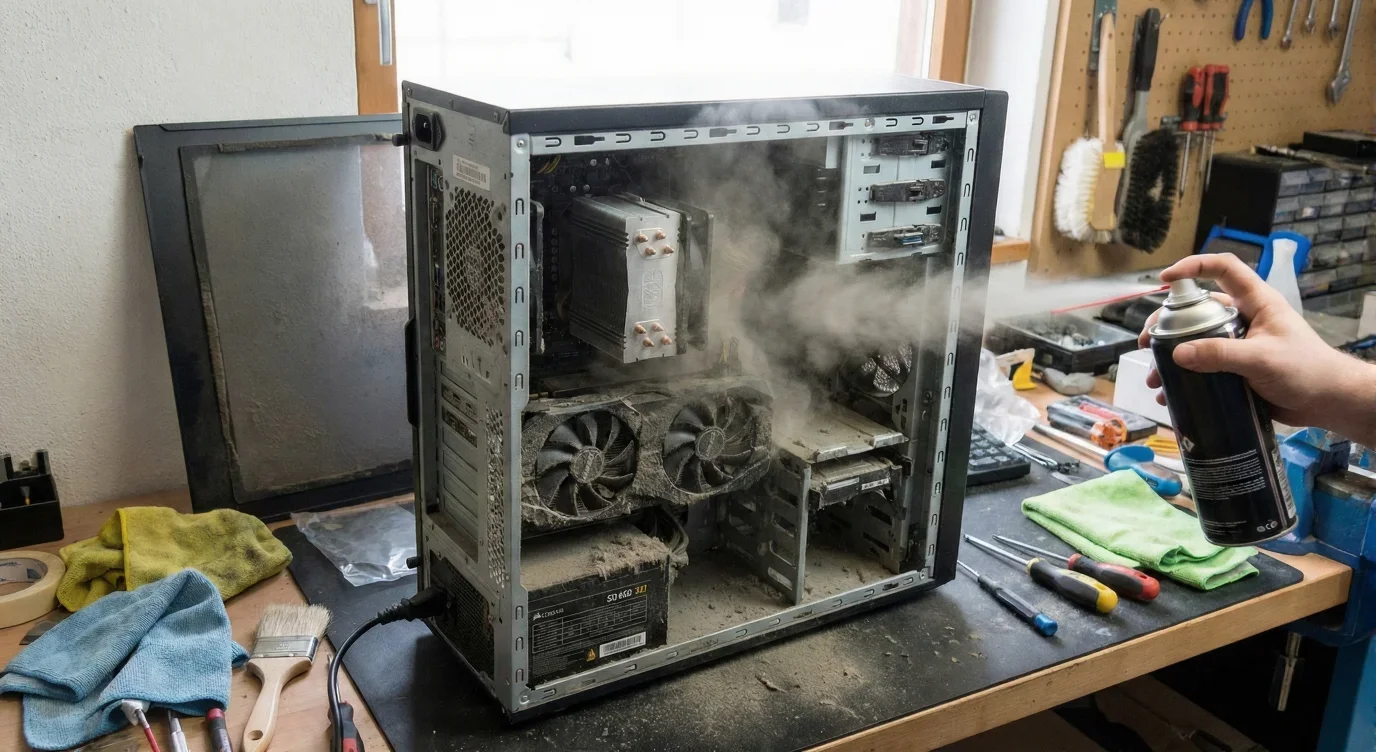
First, go buy compressed air. You can get cans of this stuff at any office supply store or online. If you are serious about this or just hate generating waste, you can buy an electric datavac duster, but the canned stuff works fine for most people. You also need a microfiber cloth and a soft anti-static brush.
Now, I need you to listen to me very carefully regarding what not to use. Do not use a vacuum cleaner on the inside of your PC. I don't care if it has a hose attachment. Vacuum cleaners generate massive amounts of static electricity. If you touch that nozzle to your motherboard or GPU, you run a very real risk of frying the components with ESD (Electrostatic Discharge). Vacuums also have high suction that can spin your fans too fast, which can damage the bearings or generate a back-current that fries the fan header. Put the Dyson away.
How Often Should You Exorcise the Dust Bunnies?
Everyone asks me how often they need to do this. The answer is that it depends entirely on how you live. If you live in a sterile lab, you are fine. If you live in a basement with three golden retrievers, you are in trouble. I have broken down the timeline below so you can figure out where you fit in.
The Surgery: Step-by-Step Cleaning Guide
You have your air, you have your schedule, and you have hopefully put the vacuum back in the closet. Here is the actual process to get your PC running cool again.
Step 1: Power Down and Disconnect
This sounds obvious, but I have seen people try to dust a running PC. Don't be that person. Shut the computer down completely. Flip the switch on the back of the Power Supply Unit (PSU) to the "O" or Off position. Unplug the power cable from the wall. You want zero electricity flowing through this thing while you are working.
Step 2: Attack the Filters First
Most modern cases have dust filters on the front intakes, the bottom for the PSU, and sometimes the top. These are your first line of defense. Usually, you can just slide these out or pull them off if they are magnetic. Take them away from the PC (seriously, go outside or to a sink). You can wipe these down with a damp cloth or run them under water if they are really caked. Just make sure they are 100% dry before you put them back.
Step 3: Open the Case
Unscrew the side panel thumb screws and carefully slide the glass or metal panel off. Set it aside somewhere safe where you won't step on it. Take a look inside. If you see thick clumps of dust bunnies in the bottom or corners, you can pick those out by hand. Just get the big stuff out of the way before we start blowing things around.
Step 4: The Compressed Air Strategy
Take your can of compressed air. Keep the can upright. If you tilt it too much or shake it while spraying, it can spray liquid propellant, which can damage sensitive electronics. Do short, controlled bursts. Do not just hold the trigger down until the can freezes over.
You want to work from the top of the case down to the bottom. Dust falls, gravity works, use it. Blow out the top fans and radiator first, then move to the CPU cooler, then the GPU, and finally the bottom of the case.
Step 5: The Golden Rule of Fans
This is the most important mechanical tip I can give you. When you are spraying air at your fans (case fans, CPU fans, or GPU fans), hold the fan blades in place with your finger. Do not let the compressed air spin the fans.
It looks fun to make them spin at 10,000 RPM, but you can ruin the bearings. Even worse, a fan spinning that fast acts as a generator and can send voltage back into the motherboard header, potentially frying the port. Hold the blade, spray the dust off, and move on.
Step 6: Deep Cleaning Components
For the motherboard and RAM, be gentle. Use the air to dislodge dust from the DIMM slots and the motherboard VRMs. If there is stubborn dust stuck to the backplate of your GPU or the flat surfaces of the case, this is where you use that dry microfiber cloth or the soft brush. Do not scrub the motherboard with a cloth; the tiny capacitors can snag and rip off. Just use air for the delicate circuit boards.
Step 7: The PSU and Closing Up
Finally, blow some air through the back of your power supply unit. Dust loves to hide in there. Once you have chased all the dust out of the case, it is going to be settling on the floor around you. Now you can use the vacuum to clean up the floor, not the PC.
Put the side panel back on, screw it in, reattach your filters, and plug everything back in. When you boot up, you might notice your fans are actually quieter. That is the sound of your PC thanking you for letting it breathe. Regular maintenance keeps your hardware living longer, saves you money on replacements, and stops your room from smelling like burnt dust during a marathon session.
YOU MIGHT ALSO LIKE
The Steam Winter Sale Is Back To Ravage Your Bank Account And I Am Ready To Be Hurt Again
Naughty Dog Is Back To Mandating Crunch, And They Gave Employees A ‘Suffering’ Coin To Prove It
PIONER Early Access Review: Great Gunplay Buried Under Tech Issues
Nvidia Is Reportedly Slashing RTX 50 Series Production, Because We Can’t Have Nice Things
Marathon’s Art Director Just Quit Bungie, And The Timing Is… Interesting