Death Howl Beginner's Guide: No, You're Not Doing It Wrong
Death Howl refuses to explain anything and just expects you to survive in the spirit realm, so here's everything the game won't tell you.
I need to start with this: Death Howl doesn't have a tutorial. There's no gentle introduction to the deckbuilding systems or combat mechanics. The game throws you into the spirit world, hands you five basic cards, and says "good luck" while you die repeatedly to the same wolf spirit. You'll backtrack to Sacred Groves constantly, wonder if you're playing wrong, and generally feel like the game is punishing you for existing. Here's the thing though: this is exactly how Death Howl is designed, and once you understand that, everything clicks.
Death Howl is a tactical deckbuilding RPG inspired by Soulslike philosophy and Scandinavian folklore. You play as Ro, searching the spirit realm for your deceased son's soul. The world is hostile, unforgiving, and designed to kill you constantly. That's not a bug. The game expects you to learn through repeated failure, and honestly, once you embrace that loop instead of fighting it, the experience becomes incredibly satisfying.
This guide covers everything the game refuses to explain: how healing actually works, expanding your deck, what those cryptic map symbols mean, which early cards don't suck, and why backtracking is mandatory progression rather than failure.
Sacred Groves Are Your Lifeline (Literally)
Sacred Groves heal you outside combat, and reaching them should be your only goal when starting new areas. Forget the quest markers. You're too far away and too weak to worry about objectives. After you unlock your map by activating the first Grove, open it and head directly for the closest Grove marker you can see.
Groves are always blocked by two or three battles containing one to four enemies. You retain all damage from each fight until you reach the Grove. There's no health regeneration, no automatic healing between encounters, nothing. Take damage in battle one? You're carrying that into battle two and three. This makes route planning crucial because you need to calculate whether you can actually survive the gauntlet between your current position and the next healing point.
You can heal during combat through specific cards, though you won't start with these. Some battles feature special items on the grid that restore health when hit. These are situational and unreliable, so don't count on them as primary healing.
Here's the brutal part: if you backtrack to a previous Grove because you're low on health, all your forward progress disappears. Every creature you killed respawns. This feels terrible initially, like the game is punishing caution. But it's actually core progression because you need those respawns to farm resources and Death Howls for deck building. It's not punishment, it's a farming loop disguised as failure.
Death Howls Are Everything (Spend Them Wisely)
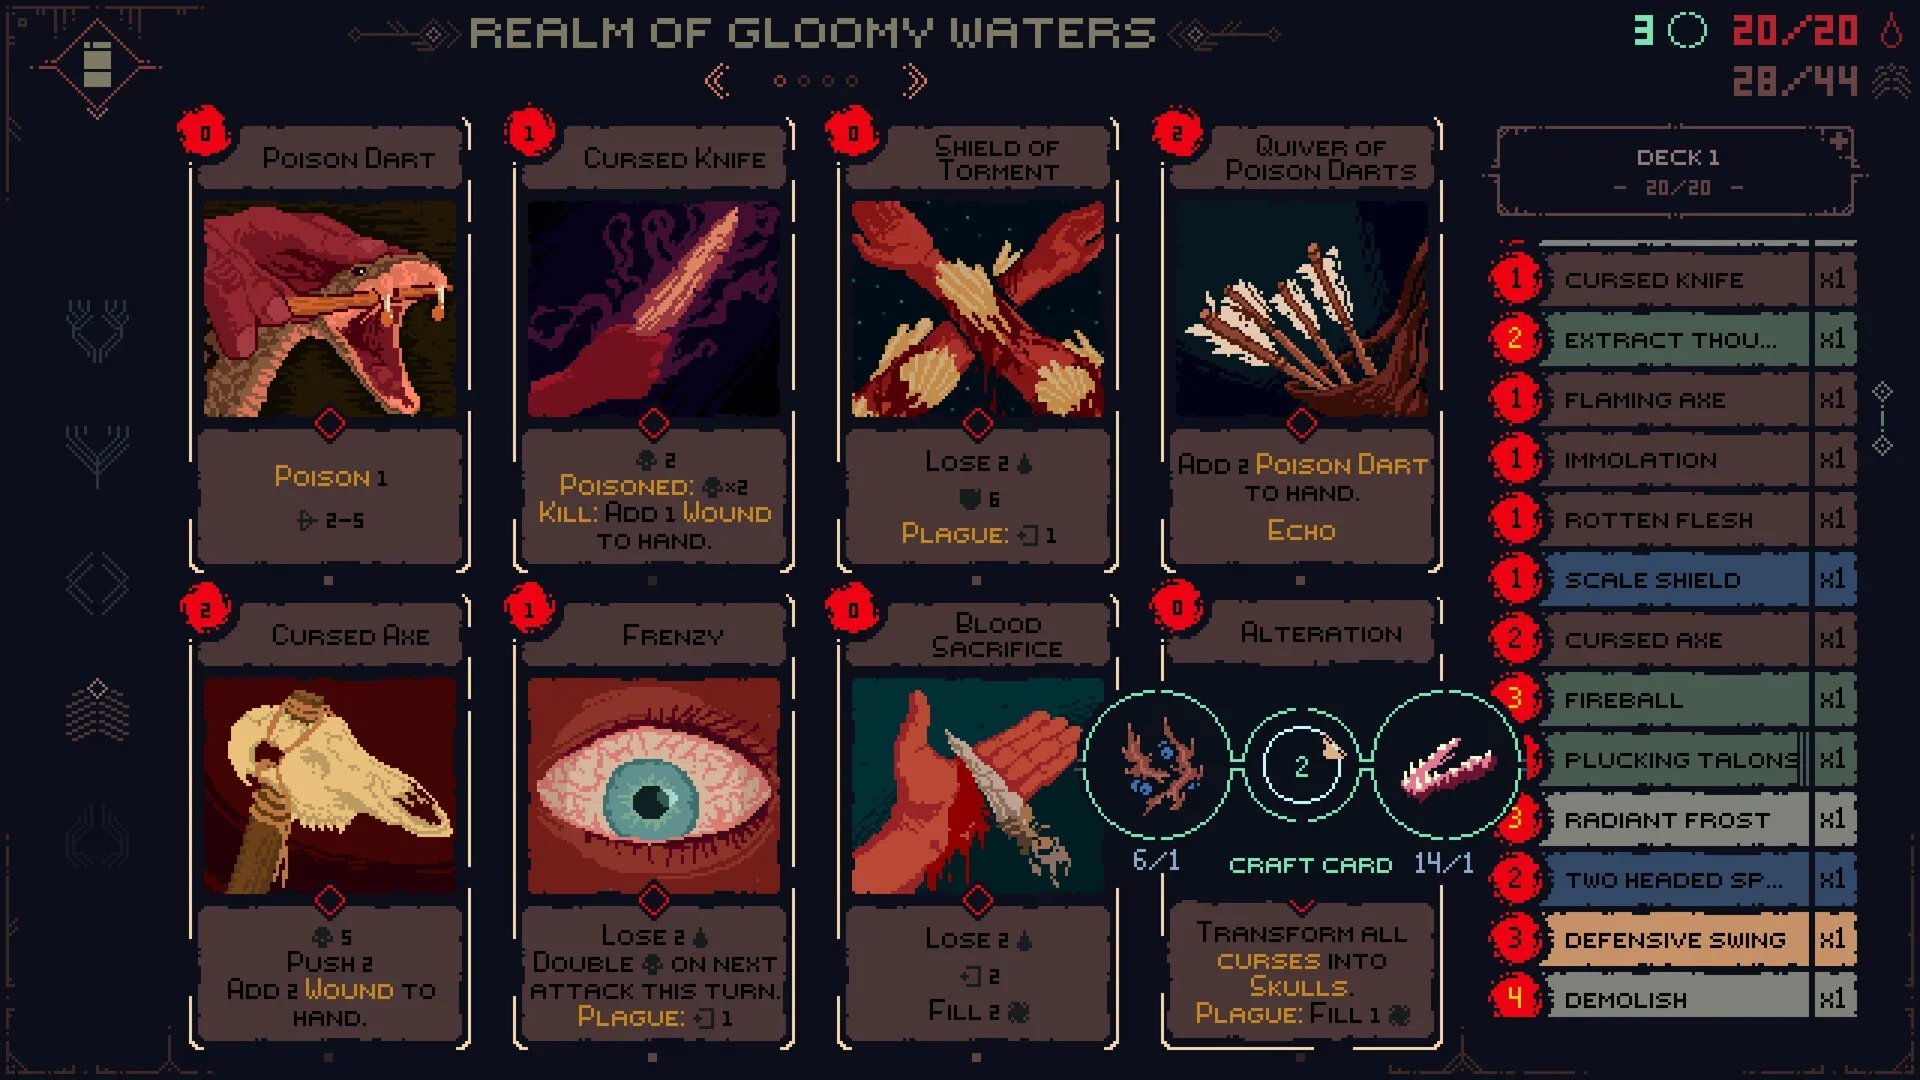
You start with maybe five basic cards. The only way to expand your deck is defeating creatures repeatedly and using the resources they drop. You'll unlock new cards using crafting materials and "Death Howls," which are the physical echo of a creature's last cry when you kill them. Very metal, very Scandinavian folklore.
Death Howls are your primary currency. You use them to craft cards and convert them into Teardrop Points at Sacred Groves, which unlock combat skills. This creates resource tension: craft cards to strengthen your deck, or convert to Teardrops for skill upgrades?
Here's something critical the game never explains: craft cards before resting at Groves. When you rest to heal, the game automatically converts all your Death Howls into Teardrops. You can't save them. So if you're planning to craft specific cards, do it before healing, or you'll burn your currency on Teardrops and realize too late you needed those Death Howls for that card you were saving for.
Enemy respawns aren't punishment, they're farming opportunities. You can cycle the same encounters repeatedly to grind Death Howls and materials. Find a Grove close to enemies you can reliably beat, rest there, and farm that loop until you've crafted the cards you need.
Combat Is Grid-Based Chess With Cards
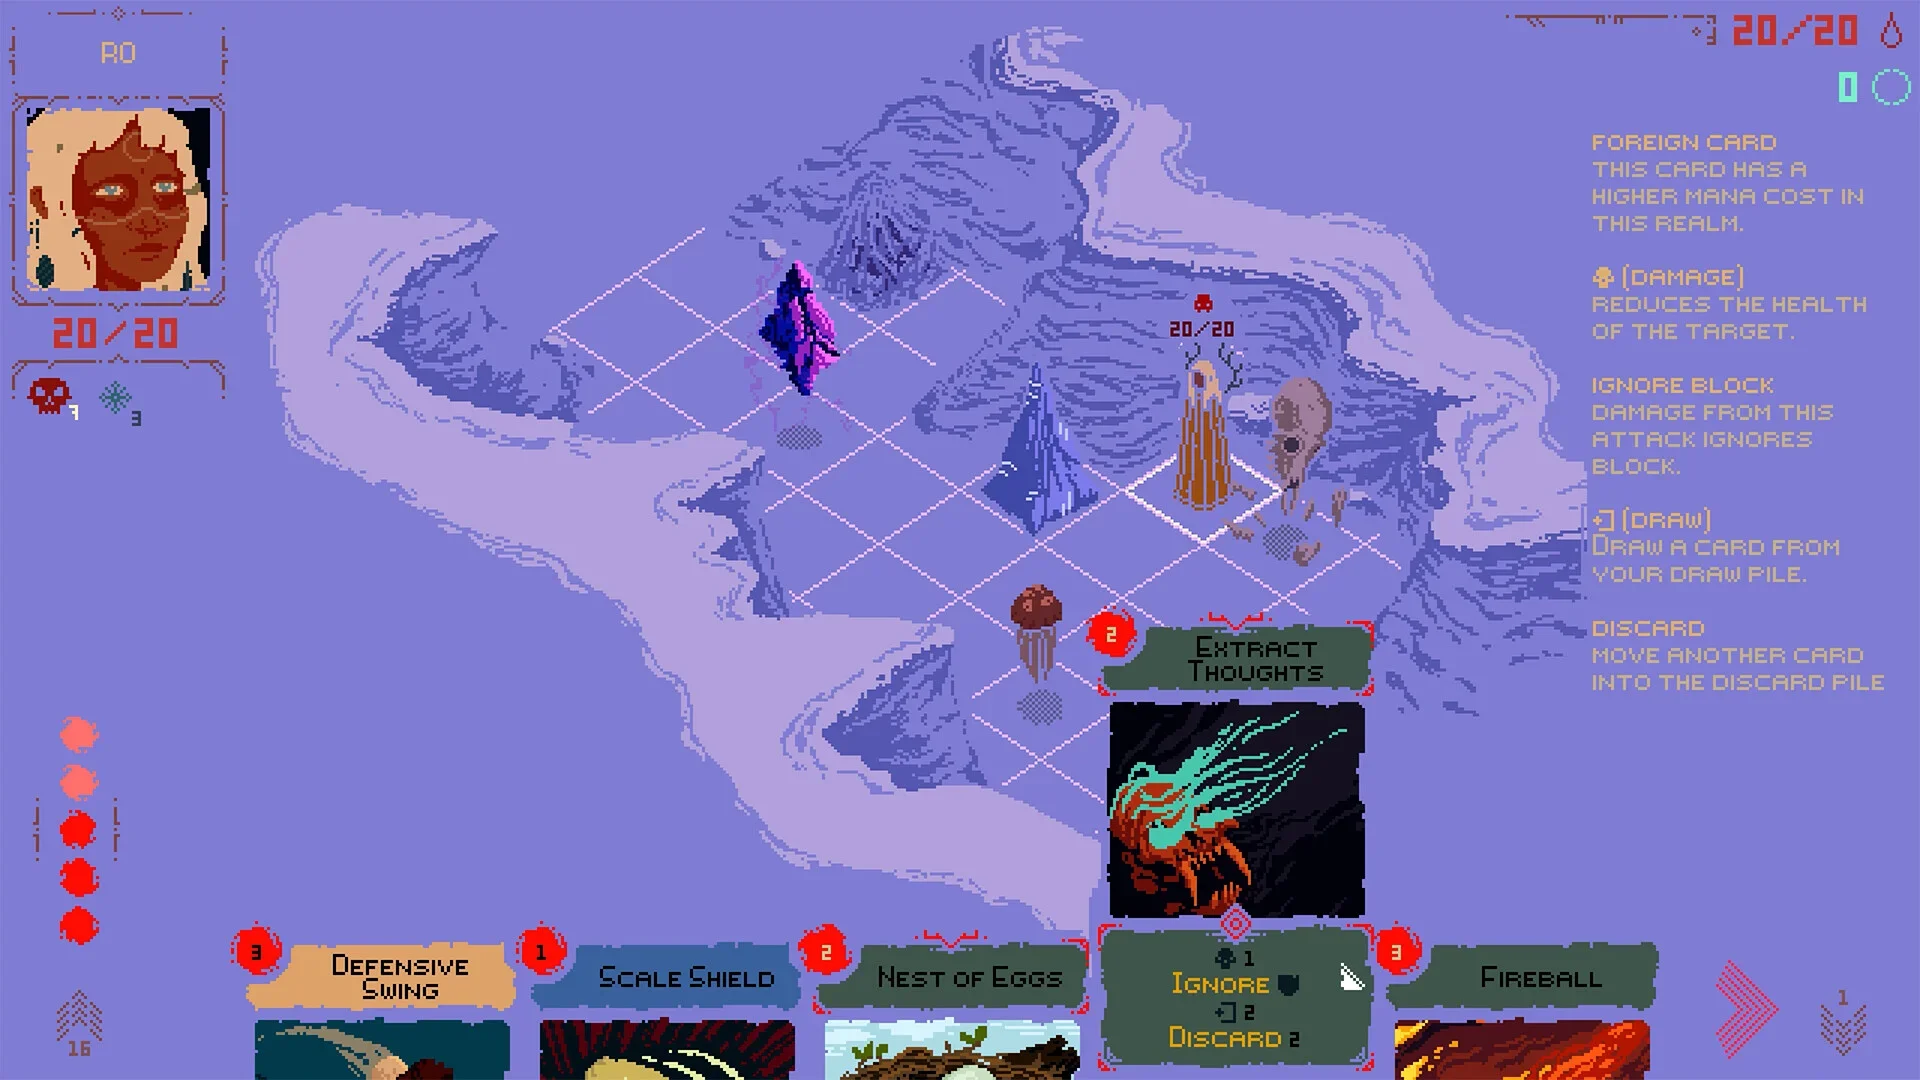
Combat uses tactical grid-based gameplay with five mana points per turn. Each card shows its cost in the top-left corner. Movement also costs mana, with each square costing one point. You move orthogonally like a chess rook, no diagonals, and with way less range than you'd like.
This creates constant tension between positioning and card usage. Spend three mana moving into optimal position and only have two left for cards? Or stay in bad position to play more cards? Every turn is a puzzle calculating mana efficiency against tactical positioning.
Cards have different ranges and requirements. Some only work adjacent to enemies. Others need specific distance. Some heal or shield. Others deal damage or apply status effects. The game revolves around planning movement and timing cards based on enemy positions and available mana.
Enemies use cards against you, and some will absolutely wreck your run. Doomed is the worst for beginners. If you can't discard it, you die at the end of your turn. Period. Learn which enemies apply Doomed and prioritize killing them first.
At turn end, you discard all remaining cards. No saving them. This forces aggressive play rather than hoarding resources waiting for perfect moments.
The Backtracking Is Intentional (Stop Fighting It)
The back-and-forth between Sacred Groves and battle grids is the core loop. When you're in the first hour, this makes you feel like you're failing. You're not. This is how Death Howl is designed. You must fight the same creatures repeatedly to progress because the only way to gain skills and cards is collecting their resources.
Think of it like Dark Souls farming souls between bonfires. You're not failing when you retreat to heal and push forward again. You're engaging with intended progression. Each cycle through the same enemies should feel slightly easier as you learn patterns and improve your deck.
Fighting the same spirit ten times isn't tedious grinding, it's the tutorial the game refuses to give you explicitly. You're learning attack patterns, understanding card synergies, and figuring out optimal positioning through repetition.
Map Symbols Decoded
Your map shows symbols that are never explained. Here's what they actually mean.
Red diamond with center dot: spirits you haven't defeated this run. These reset when you die or rest at Groves.
Golden stag symbols: Nests you need to uncover before entering. Often contain elite enemies guarding valuable Teardrops.
Four green points forming a diamond: Sacred Groves. Your heal points and fast travel locations.
Two golden arrows: your current position.
Light green X: active quest objectives. Usually too far away to worry about initially.
Early Cards That Don't Suck
Not all early cards are created equal. Here's what to prioritize.
Block of Wood (2 mana): grants 2 shield. Available from start, incredibly useful.
Aim for the Heart (2 mana): deals 3 damage at range. Requires unlock. Ranged damage is crucial.
Furious Strike (4 mana, -1 per card played this turn): deals 3 damage. Cost reduction makes this extremely efficient.
Defensive Swing (3 mana, -1 per shield point): deals 3 damage. Combines perfectly with Block of Wood.
Quick Strike (1 mana): deals 1 damage, pushes enemies back 2 spaces. Incredible for repositioning.
Sprint (1 mana, sacrifice a card): move 2 spaces. Emergency repositioning tool.
Focus on unlocking Aim for the Heart and Furious Strike first. These form the foundation of effective early-game decks.
Realms Reset Everything (Plan Accordingly)
The spirit world has four realms, each with multiple sub-regions. Every realm has its own Teardrop Skill Tree you must unlock separately. Maxed the skill tree in realm one? You start from scratch in realm two.
Grind the previous realm for extra Teardrops before transitioning. This lets you grab essential upgrades immediately in the new zone rather than struggling with zero skills.
Card costs also increase when switching realms. Using cards from previous realms makes them cost more mana. This doesn't affect Realmless Cards, which maintain consistent costs. Having Realmless Cards in your deck is the intended strategy. As you unlock realm-specific cards, gradually replace old cards with new ones optimized for the current zone.
Card Synergies Worth Learning
Some cards trigger special effects based on conditions. Understanding these creates combos that maximize damage while minimizing mana waste.
Simple combo: Quick Strike pushes enemy back. Aim for the Heart hits them at range. Block of Wood grants shield. Defensive Swing costs less because of shield. Sprint repositions you to safety by sacrificing remaining card.
This combo maximizes damage output while setting up defensive positioning for the enemy's turn. As you unlock more cards, synergy options explode. Pay attention to cost-reduction mechanics and build your deck around triggering those conditions consistently.
Other Critical Stuff
Teardrops unlock from defeating spirits and finding Nests. Visit Groves to convert Death Howls into Teardrop Points for new skills. Different realms have different skills, so prioritize mobility and defense first in each new area.
Totems provide battle advantages. You can only equip one early game. Brother's Bracelet and Mother's Cloth are generally the best early choices.
Exploration is mandatory. The spirit world has items giving combat advantages. Best early rewards like Tree Root Totem are hidden behind tough Elder Spirit encounters. Hidden cave entrances exist that you can only find by clicking suspicious areas while exploring.
The Grind Is The Game
Death Howl is grindy. Rush straight for objectives and you'll hit brick walls. You need to fight spirits repeatedly to learn patterns and earn Death Howls.
Find a Grove near enemies you can beat, rest there, and cycle those encounters. Over time you'll unlock cards and upgrades, building a deck optimized for your current realm.
The grind isn't punishment, it's the progression system. Death Howl tests pattern recognition rather than twitch reflexes. Each cycle through familiar enemies should feel smoother as your deck improves and understanding deepens.
Death Howl is brutal and refuses to explain itself. The lack of tutorial combined with punishing design creates a steep learning curve. But once you understand that backtracking is mandatory, grinding is intended, and dying repeatedly is how you learn, the game transforms into an incredibly satisfying tactical deckbuilder.
The atmospheric Scandinavian folklore setting, strategic grid-based combat, and constant resource allocation decisions create a unique experience rewarding patience and planning. If you embrace the Soulslike philosophy and accept that failure teaches you the mechanics, you'll find a deeply rewarding tactical game hiding beneath the initial frustration.
When you're bouncing between the same Grove and battle grid for the tenth time wondering if you're playing wrong, you're not. That's exactly how Death Howl wants you to play.