Morbid Metal Beginner Guide: How To Survive The Switching Roguelite
It is incredibly easy to treat Morbid Metal like a standard hack and slash game, but trying to brute force your way through these arenas will absolutely get you killed.
The core of this game is its real time character switching system. It plays closer to a chaotic tag team fighter than a traditional roguelite. If you are just mashing buttons with your starting character and completely ignoring the rest of the roster, you are fundamentally playing the game wrong and making your own life miserable. You have to weave your characters together to build massive combos, manage your cooldowns, and exploit the environmental layouts.
Because the game is currently in Early Access, the build variety and synergy paths are still a bit shallow. This means your raw mechanical skill and macro upgrade choices are heavily tested right out of the gate. If you want to survive the Sublime Garden and eventually push past Prophet, you need to establish a solid foundation immediately. I have spent entirely too much time getting swarmed by metallic monstrosities, so here are the core combat mechanics and progression strategies you need to actually win.
Mastering The Tag Team Combat Flow
You cannot just pick a favorite character and stick with them out of stubbornness. You are forced to operate as a cohesive trio, and learning how to hot swap under pressure is mandatory.
Understand The Roster Roles
By the time you reach the second biome, you will have access to your full team. Each character serves a highly specific tactical purpose in your rotation. Understanding these roles is the only way to avoid getting pinned against a wall and beaten to death by generic grunts.
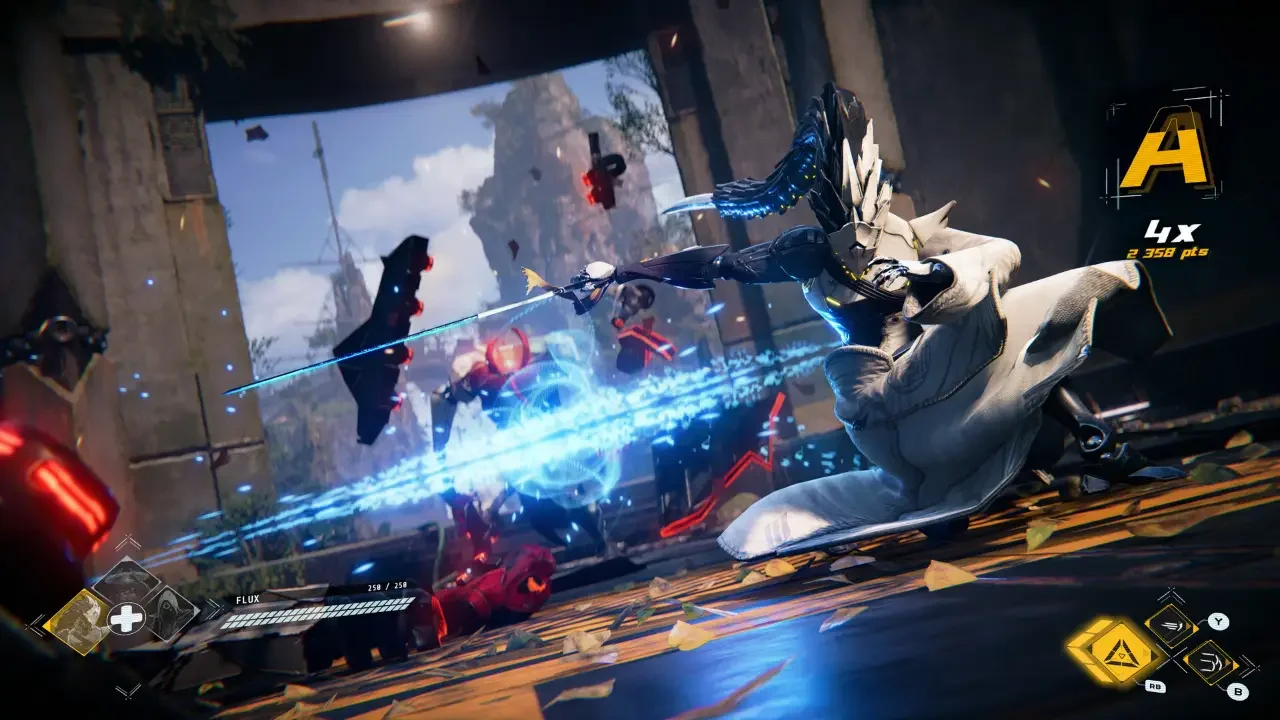
Flux is your fast and aggressive opener. He excels at closing the distance quickly with his specific Protocols and initiating the combo. You want him on the field when you need to cross an arena fast and stagger an isolated target.
Vekta is the zoning expert. She relies entirely on projectiles and creating space. Use her to safely chip away at enemies from a distance or deploy crowd control moves to group targets up before tagging in the heavy hitters. When the screen gets too chaotic, bringing Vekta in buys you precious seconds to breathe.
Ekku is the executioner. He is incredibly slow, but he hits like an absolute freight train. You use Flux to start the combo, use Vekta to group them up, and then tag Ekku in to launch enemies into the air or finish the sequence with massive burst damage. Do not leave Ekku out in the open for too long, or his sluggish animations will get you punished.
Ground The Flying Threats First
When you walk into a new combat arena, the game will immediately swamp you with varied enemy types. Ignore the massive imposing ground units and immediately hunt down the flying robots.
These aerial units love to hover just outside of your camera field of view and snipe you with projectiles while you are busy fighting a heavy brute. Yes, the game gives you a red indicator arrow when an attack is coming. But in the middle of a chaotic combo with particle effects exploding everywhere, you will absolutely miss it. It is incredibly frustrating to lose half your health to a drone you did not even see. Use Flux to dash into the air and wipe them out immediately. As an added bonus, staying airborne while clearing these drones usually keeps you safe from the melee grunts swinging blindly on the ground below.
Navigating Upgrades And Routines
Your run progression relies heavily on the RNG drops you get from combat and chests. You have to be incredibly deliberate with what you select or you will end up with a bloated, useless build.
Abuse The Leak Status
After clearing a room, you will often be rewarded with Routines, which modify your stats or specific character Protocols. The current Early Access build lacks massive game breaking synergies, but there is one standout ailment you must prioritize over everything else. That ailment is Leak.
Leak is essentially a poison effect that deals continuous damage over time, and it works against every single enemy type, including main bosses like Saru. If you can find complementary Routines that allow the Leak status to spread from dying enemies to surrounding targets, you can passively melt entire rooms while you focus entirely on dodging. It takes a lot of the mechanical pressure off your shoulders during the later, more absurd combat encounters.
Strategic Buff Selection
Do not just blindly pick the first buff you see at the end of a successful room. The upgrade pool is heavily diluted across your three characters. If you find a Routine that drastically buffs Ekku and his combo damage, but you primarily use Ekku strictly for single hit finishers, you are wasting the upgrade slot. Tailor your selections to support the specific role each character plays in your rotation.
I know the community has heavily noted that you currently cannot recycle or break down unwanted Special Moves found in chests. This means you are permanently stuck with whatever clutters your pool during a run. Until the developers patch in a salvage system, you have to choose your additions very carefully.
Establishing The Void Nexus Economy
Your success in the biomes directly correlates to how you spend your permanent currency back in the hub. If you ignore your meta progression, you are just going to hit a mathematical brick wall.
Farm Your Void Matter
Void Matter is the absolute lifeblood of your permanent progression. You earn it after battles and by exploring the biomes. Do not confuse this with Nano Coins, which are only used during your current run. Void Matter is what you spend at the skill tree pillar in the hub to unlock the upgrades listed above.
If you ever feel like you made a mistake with your build, you can freely refund your upgrades by holding the designated button on the bottom left side of the skill tree screen. Do not be afraid to experiment with different hub layouts if you find yourself hard stuck on a specific biome.
Dealing With The Devil
Once you unlock the ability for Devil's Bargains to spawn, you have to approach them with extreme caution. These are found right before main bosses, offering massive buffs tied directly to crippling debuffs.
For example, the Bargain of Overclocking halves all of your skill cooldowns. This allows you to spam your most powerful abilities non stop. However, it also physically cuts your maximum health in half. You have to be incredibly confident in your Perfect Dodge timing before accepting a deal like that. Honestly, the amount of times I have ruined an otherwise flawless run by getting greedy at a Bargain shrine is embarrassing. Learn from my mistakes and only take the deals that fit your current comfort level.
Secret Paths And Corpora Planning
Finally, you need to stop running in a straight line toward the objective markers if you want to scale effectively.
Memorize The Static Spawns
While the exact order of the connecting corridors is randomized, the physical layout of those specific rooms is static. If you see a large staircase going down, always check the left side for a series of platforms leading to a hidden Repository. Memorizing these static spawn points guarantees you a massive resource advantage on subsequent runs. You will start walking into boss rooms with a full loadout simply because you bothered to check the corners.
Secure A Strong Corpora
You need to use that exploration to secure a solid Corpora item before facing the biome boss. Corpora are major, run defining perks. Finding an item like the Fountain of Life for a massive HP boost, or the Stun Matrix for a huge damage multiplier against stunned enemies, drastically tips the odds in your favor.
A good Corpora can carry a mediocre build, while a bad one will leave you sweating through every single encounter. If you manage to survive the grind and want to clear your trophy list eventually, check out our Morbid Metal achievement guide to make sure you are not missing any obscure challenges along the way.