Arc Raiders Crane House Keycard Guide: Looting The Stacking Yard
A pocket full of high tier loot means absolutely nothing if you get gunned down in a maze of rusted shipping containers.
The Riven Tides map gives us a lot of fresh territory to explore, which naturally means a whole new list of locked doors to stress over. Finding a rare key is only half the battle in Arc Raiders. Just like trying to secure the Classified Records Keycard room on the opposite side of the map, holding the plastic is practically a death sentence if you do not know exactly where you are going. Wandering around aimlessly is the easiest way to donate your inventory to a passing machine patrol.
If you snagged the Crane House Keycard, your destination is the Stacking Yard. It is a highly contested zone, but the payout is worth the risk if you play it smart. Here is my preferred route to the locked door and the safest way back to the extraction menu.
Navigating The Stacking Yard
You are going to be heading to the eastern side of the Riven Tides map. The Stacking Yard is classified as a medium loot area, meaning it attracts a steady flow of desperate players looking for a quick payday.
The Shipping Container Maze
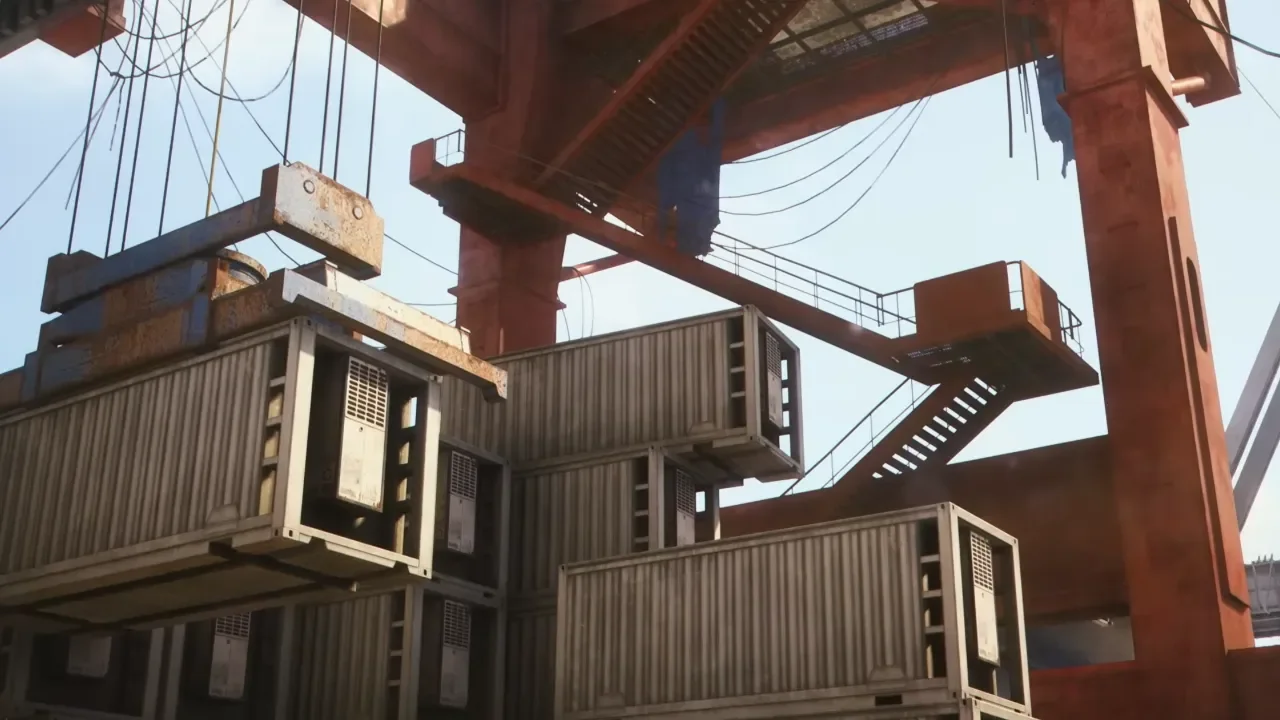
If you have ever seen a commercial shipping port, you know exactly what to expect here. The entire zone is a sprawling, chaotic labyrinth of stacked metal containers. From a tactical standpoint, it is a nightmare. The containers are stacked in a way that makes climbing incredibly tempting, but doing so exposes you to every single sniper rifle in the lobby.
You also have to deal with the local residents. The area is heavily patrolled by Arc machines. If you get caught out in the open between the container aisles, you will be shredded before you can even find cover. Keep your head down, move quietly through the shadows, and do not start a firefight unless you are completely cornered.
Finding The Crane House Door
The Stacking Yard is anchored by three main buildings. To find the locked room, you need to ignore the outer structures and focus entirely on the center building.
Choosing Your Ascent
The Crane House door is located near the very top of that central building. Getting up there requires a bit of vertical maneuvering, and you have a few different options depending on your loadout and your risk tolerance.
The most direct route is the central zipline. It shoots you straight up through the middle of the building. It is fast, but it is also loud and leaves you entirely exposed while you are on the wire. If you prefer a quieter approach, you can use the ladders mounted on either side of the structure. This forces you to do some walking up the remaining staircases, which takes more time but keeps you off the obvious vertical express lane.
If you want to get creative, you can actually reach the room by traversing across the massive cranes overlooking the yard. It is a terrifying drop if you miss a jump, but it gives you a fantastic vantage point to scout the area before you unlock the door. Alternatively, if you brought your own personal zipline, you can just forge your own path from any nearby high ground directly to the top floor.
Extracting With Your Life
Opening the door and grabbing the loot is the easy part. Getting out of the Stacking Yard is where most players fail.
Planning Your Escape
This area has an insane amount of hiding spots. Players can tuck themselves away inside open containers or crouch under the main dock infrastructure. Always assume someone heard you open that door and is currently waiting for you to climb back down.
Do not take the exact same route out that you took to get in. Keep your movement unpredictable. When it is time to leave, your best bet is to push toward one of the nearby Raider Hatches. They are relatively close to the yard and offer a quick exit if the area is clear. If those are heavily contested, you will have to make the longer trek to the Seaside Elevator.