Everything Is Crab Guide: How to Survive Your First Run And Not Become Fish Food
Before you waste three hours banging your tiny claws against a wall, you need to understand how this evolutionary nightmare actually works.
Pressure 1 is the baseline difficulty where your journey begins. Right after the painfully short tutorial, you are completely on your own. It is perfectly normal to fail your first few attempts while you figure out why a hybrid bee dog is tearing you to shreds. During a standard run, you have to survive for 20 minutes. In that tiny window, you face swarming enemies, track down massive Alpha hostiles, and fight four giant bosses. The sheer volume of evolution paths and unexplained systems is staggering. Your goal is simple on paper: survive, thrive, and kill the final boss. I am here to hand you the exact blueprint to beat the Pressure 1 bosses and make it out of the first stage in one piece.
The Genetics Codex And Mutagen Economy
You need to set yourself up for success before you even spawn into the map.
Check Your Codex
The very first thing you should do when booting up Everything Is Crab is check the Genetics Codex and the achievements tab. They point you in the exact right direction for unlocking permanent genetic upgrades. The game gets vastly easier when you have more evolutions unlocked. To secure the Bullseye genetic advancement, you need to defeat a boss with a stone. All of these requirements sit right there in the menu. Focus on these specific unlocks to give yourself a massive early advantage.
Farm Those Alphas
As you hunt, you need to manage your Mutagen Points. You earn these by defeating tougher enemies, specifically the Alpha variants marked with a star symbol on your screen. They hit like a truck, but you need to hunt them down anyway. Even the Alpha versions of harmless enemies like the Blobfish drop extra meat and mutagens. You spend these points to manipulate your build. Pay one Mutagen Point to reroll your evolution choices when you level up. If you want better gear, drop ten points to increase the rarity of your evolution selection. Relying on blind luck will send you right back to the lobby, so farm Alphas and force the upgrades you actually need.
Affinities And Map Navigation
Picking cool traits means nothing if you fight your battles in the wrong biome or ignore your map markers.
Stick To Your Diet
Creating a build means mastering evolutionary trees broken up into different affinities. The five primary types are Predator, Prey, Gregarious, Imposing, and Trickster. Developing a specific affinity increases your odds of getting more evolutions of that exact type. Choose carefully. If you select the Herbivore or Vegan evolution, picking Predator affinities will ruin your run because you suddenly get zero benefits from eating meat. Decide what kind of monstrosity you want to be early on and commit. Push in conflicting directions, and you will find yourself in an unwinnable mess.
Chase The Question Marks
As you wander the map, question marks pop up at the edge of your screen. Always follow them. They lead to Points of Interest where you can interact with structures for bonuses or special events. Every biome has unique POIs. You can find large eggs in the desert, lily pads in the water, and tree stumps in the forest. My absolute favorite is the large desert egg, which lets you spawn rare food and fight a mini boss for rapid level ups. Find seven POIs to unlock the Pioneer Genetics trait, which boosts your POI spawn rate by 50 percent. Pair that with the Nomad evolution to farm research points and scale your stats rapidly.
Biome Awareness
Before a boss fight triggers, check where you are standing. Fighting a boss in a terrible biome is a guaranteed way to lose. Move to the grassy biome whenever you can. It features moderate weather and ideal terrain for any creature. Fighting there lets you focus purely on dodging the boss instead of desperately hunting for shade or waiting for a penalized sprint cooldown to end.
Enemy Priorities And Healing Strategies
You are going to take hits while learning enemy attack patterns, so knowing what to kill and how to heal is vital.
Respect The Swarm
Your biggest early concern is the Beeware. Think of it as a horrifying mix of a dog and a bee. They have a nasty bite attack that you can dodge by moving sideways or slipping behind them. Take two or three bites right at the start, and your run is entirely over. It often makes sense to just run away from them initially. On higher difficulties, they swarm you aggressively in the opening minutes.
Safe Farming
Instead of fighting the angry swarm, farm the Blobfish. These useless fish do not attack or run away. They are a completely safe source of early meat. You can also harvest fruits from trees dotted around the map. However, enemies gain perks as the game progresses. During the third phase, right after you beat the second boss, Blobfish become poisonous to the touch. Do not attack late game Blobfish. They deal an absurd amount of damage if you lack poison resistance. I have died to toxic Blobfish more times than I care to admit.
Staying Alive
When you inevitably take a beating, you have a few ways to recover. Look for sparkling food dropping from dead enemies or corpses. Consuming it instantly restores a chunk of HP. You can also grab evolutions that provide Regeneration for a slow, steady heal over time. Active abilities like Leech replenish your health directly during combat. Also, finding the desert oasis POI gives you a permanent option to boost your baseline Regeneration stat.
Building Your Social Army
The social skill tree is incredibly overpowered and offers the safest strategy for clearing early runs.
Amass Your Followers
Most of my early wins relied entirely on the social skill. You can amass up to 12 charmed allies at once. This creates a massive army that sponges incoming attacks, provides passive buffs, and helps you melt the final boss. The aggro split alone makes this build worth the heavy investment.
The Ideal Setup
To create this setup, target the Gregarious affinity. Look for a tail evolution to unlock the Tail Wag skill. This periodically charms the enemies swarming you. Combine this with the Alpha specialization to gain extra social stats, and equip antennae for a flat boost to your charm capabilities. Max out these three traits, and your total social skill will gather a massive swarm of followers, turning the hardest encounters into a complete joke.
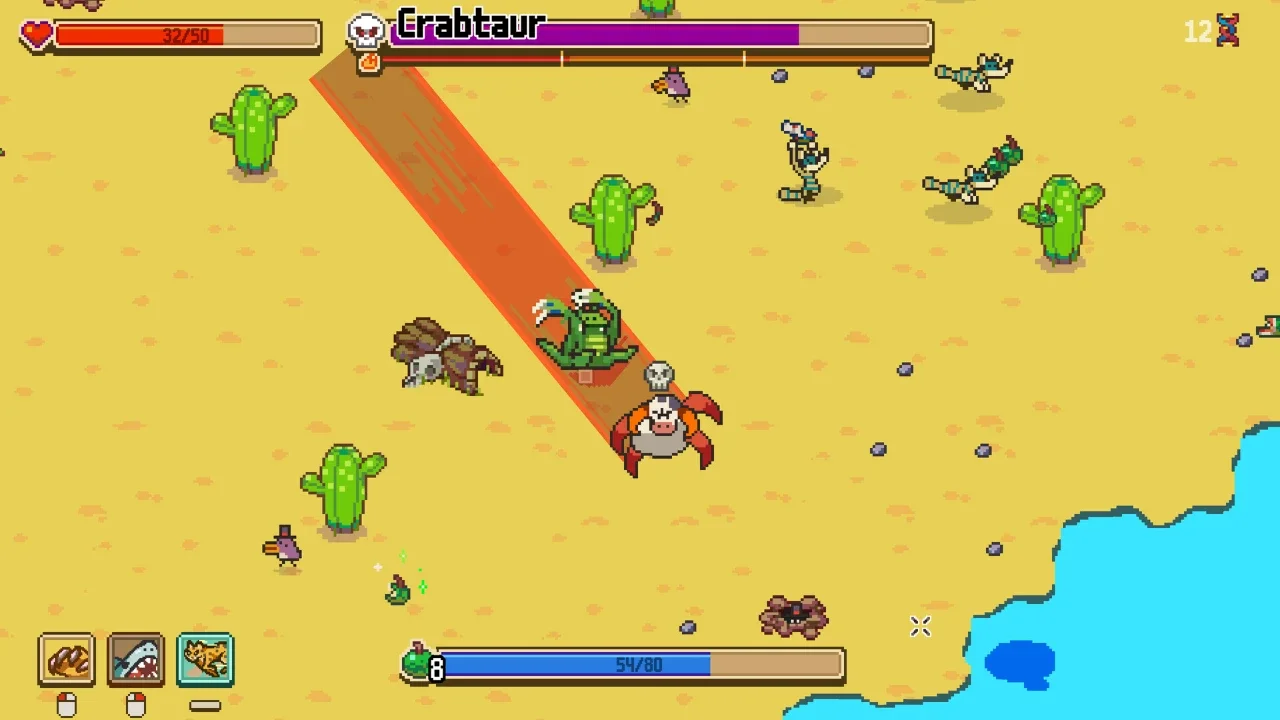
Boss Fight Survival Breakdown
A standard run is broken up by four distinct boss encounters, and knowing their gimmicks is the only way you survive the full 20 minutes.
The first two bosses you face are randomized from a specific pool of five: Crabtaur, Aquaconda, Clawdia, Shellephant, and Krabaroo. The final boss is always the Krabken. Going into these fights blind will get you put six feet under in seconds. I put together the exact survival strategies for the early randomized bosses in the table below.