Monster Hunter Stories 3 Combat Guide: Weapon Mechanics and Battle Strategy
If you are getting repeatedly flattened by a monster that telegraphs every single attack, you are fundamentally misunderstanding how combat works in this game.
I understand the frustration. You just crafted a shiny new armor set, your health bar looks massive, and you think you can brute force your way through an Elder Dragon. Then the beast glows red, completely ignores your basic slash, and wipes half your party. The combat system in Monster Hunter Stories 3 is deeply mathematical. It relies on predicting behavior, managing specific gauges, and knowing exactly when to go on the defensive. You cannot just pick a weapon because it looks cool. You need to understand the underlying mechanics, or you will spend half your playtime staring at a game over screen.
Reading the Battlefield: Attack Lines and Head-to-Heads
Before we even touch the weapons, you need to understand what the monster is planning. This game literally draws a line connecting the enemy to its target. If you are ignoring these visual cues, you are throwing away free damage and actively getting your Monsties killed.
A blue line means the enemy is targeting one of your allies with a standard attack. A gold line means that monster is looking directly at you. When you are targeted, you need to counter with the correct attack type to trigger a Head-to-Head. It is a simple rock paper scissors system. Power beats Technical. Technical beats Speed. Speed beats Power. Winning this exchange mitigates incoming damage and builds your Kinship Gauge.
If you match your winning attack type with your Monstie's attack type, you trigger a Double Attack. This entirely cancels the enemy turn. I cannot stress this enough. Canceling an enemy turn is the absolute most powerful defensive mechanic you have in this game.
If you see a red line, panic. That indicates an uncounterable attack. You cannot Double Attack your way out of it. You either need to use a defensive skill, pop an evasion buff, or try to stun the monster by breaking a specific body part. If there is no line at all, the monster is either buffing itself or preparing a massive area of effect attack that will hit your entire squad. Pull out your defensive powders or use a Guard skill immediately.
The Three Damage Types
Monsters have specific weaknesses on different body parts. Hitting a hardened shell with a sword will barely leave a scratch, but smashing it with a hammer might shatter it completely. You carry three weapons into battle, and your loadout should ideally cover all three damage profiles.
Breaking Down the Arsenal
Every weapon in this game operates on a completely different mechanical system. Picking one requires learning its specific gauge and combat rhythm. If you are struggling to make a dent in Feral Monsters, you are probably mismanaging your weapon resources.
Slashing Weapons
The Great Sword is arguably the most straightforward weapon in the game, making it perfect for beginners. It relies on a Charge Gauge. You fill this gauge by winning Head-to-Heads or using specific foundational skills. Once the meter is filled, you unleash massive charged attacks that chunk monster health bars. It is slow, heavy, and extremely satisfying.
The Long Sword is far more technical. It utilizes a Spirit Gauge that unlocks Stance Attacks as it fills. These attacks trigger unique reaction effects that completely alter your combat flow. Most of these combos end with a Special Sheathe, which drastically amplifies your next few hits. If you enjoy maintaining momentum and dancing around enemy strikes, the Long Sword is incredibly rewarding.
Blunt Weapons
If you want to completely ruin a monster's day, equip the Hammer. This is a pure damage machine designed specifically for breaking parts. Smashing a monster's leg until it shatters often staggers the beast, effectively causing it to skip a turn. It requires you to know monster weaknesses perfectly, but the tactical payoff is massive.
The Hunting Horn is the polar opposite. It operates as a heavy support weapon. Instead of raw damage, you are playing notes to queue up Melody effects on a dedicated bar. Playing the correct sequence casts team wide buffs, heals, or elemental resistances. When paired with items crafted from your combination recipes, a good Hunting Horn player makes the entire party virtually unkillable.
Piercing Weapons
The Bow is the ultimate utility weapon. Like the Great Sword, it uses a Charge Gauge. But instead of just doing more damage, charging the Bow allows you to apply unique Coatings to your arrows. These coatings inflict severe status conditions like poison or paralysis. It is a fantastic weapon for controlling the pace of the fight while standing at a relatively safe distance.
The Gunlance is the most complex weapon on the roster, but it offers unparalleled defensive capabilities. It uses a Shell mechanic that acts as ammunition. You fire these explosive shells for massive damage, but you have to actively reload them by winning Head-to-Heads or using specific skills. It also comes packed with Protective Skills that draw enemy aggression toward you and mitigate incoming damage. If you are constantly dying, learning the Gunlance shield mechanics will absolutely save your life.
The Kinship Gauge and Swapping
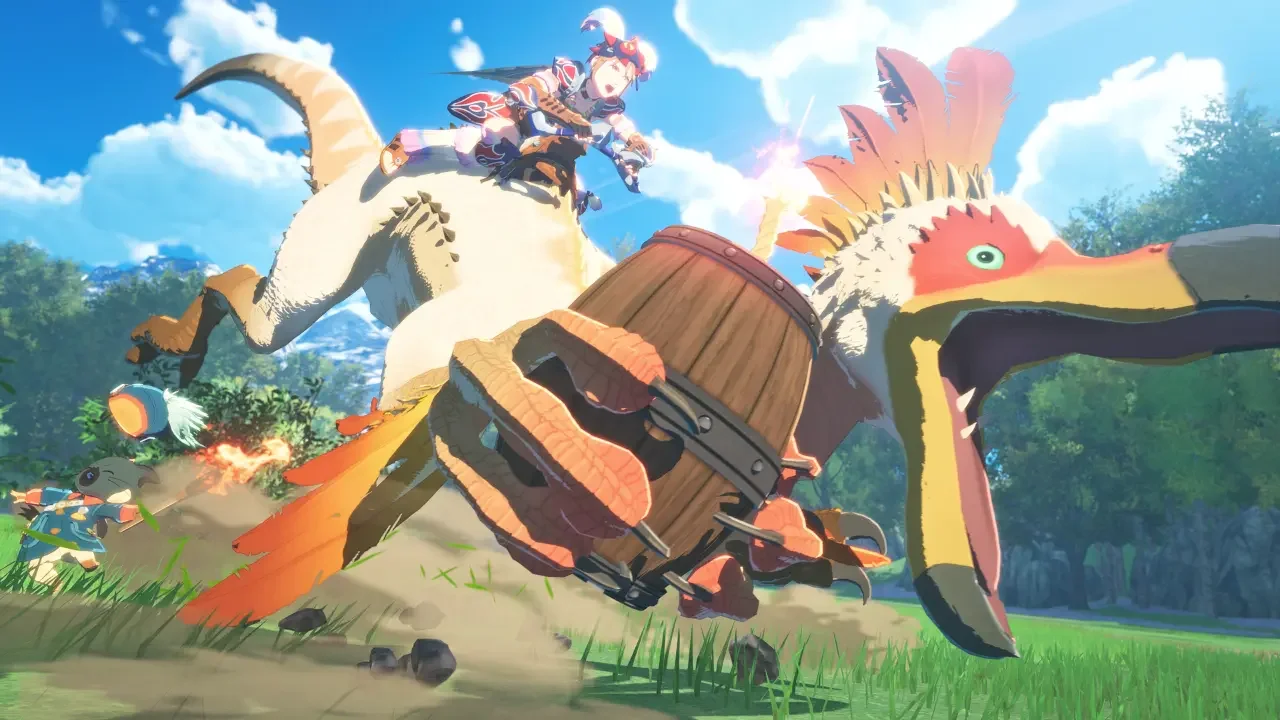
Your Kinship Gauge is your ultimate combat resource. Building it allows you to issue direct commands to your Monsties. If you max it out, you can ride your beast.
Riding is not just for flashy finishing moves. The moment you mount your Monstie, your health pools merge, you heal significantly, all abnormal status effects are wiped clean, and your attack and defense stats spike. You can even continue doing standard attacks while riding to level up your Kinship Gauge further, resulting in a devastating ultimate attack.
I see players constantly swapping their best monsties out every single turn. Stop doing this unless it is an absolute emergency. The Kinship Gauge is tied to the individual Monstie. If you swap them out, they keep their current meter, but you have to start from zero with the new creature. Only swap if your current partner is targeted by a Head-to-Head and lacks the correct attack type to counter it. Otherwise, keep them on the field, build that meter, and unleash a Kinship Skill to obliterate whatever is standing in your way.